# Medications
# Introduction
The purpose of this application is to allow the user to create, edit or delete medications and med pass records for use in the FlexMAR application.
# Launch the App
The app can be accessed in your browser by entering the Medications URL in your browser’s address bar.
# Log In
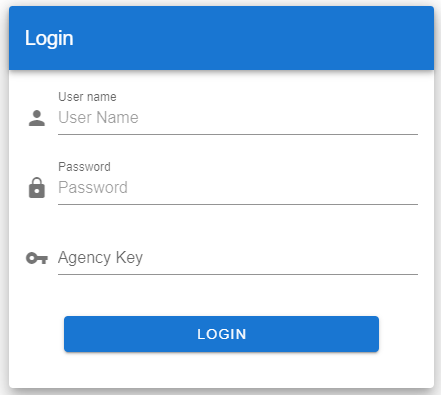
The Login screen will be presented when you first launch the web app. The user will insert their User Name, Password, and Agency Key assigned to them by their Admin.
# Home Screen

The Home Screen will provide access to any agencies to which the user has access. If the user has access to multiple agencies, they will be listed alphabetically down the left-hand side in the Agency List. The Blue Circle Menu is available in the lower right corner.
# Blue Circle Menu

When a user selects the Menu button located in the bottom right-hand corner, a list of available functions will be displayed.
# Functions

The functions from top to bottom are Logout, User Guide, Light/Dark Mode, Select Client, Active/Inactive Meds, Search Agency, and Close Menu
# Logout

When logging out, any information not saved, will not be saved and will not be able to be retrieved.

This function will print medication records for a specified client and date range.
# User Guide

This is how a user can access the User Guide through Medications.
# Light/Dark Mode

This function will toggle between light and dark mode.
# Active/Inactive Meds

This function will allow the user to toggle between Active and Inactive Meds, meaning Meds that the patient is currently taking (Active) and Meds that the patient is not currently taking (Inactive). The Meds will be shown on the Client’s Medication Grid. This can be accessed by selecting an agency, and then selecting a client. This can be switched at any point from Active/Inactive while still being on the Client’s Medication Grid. The grid will update and show the selected meds.
# Search Agency

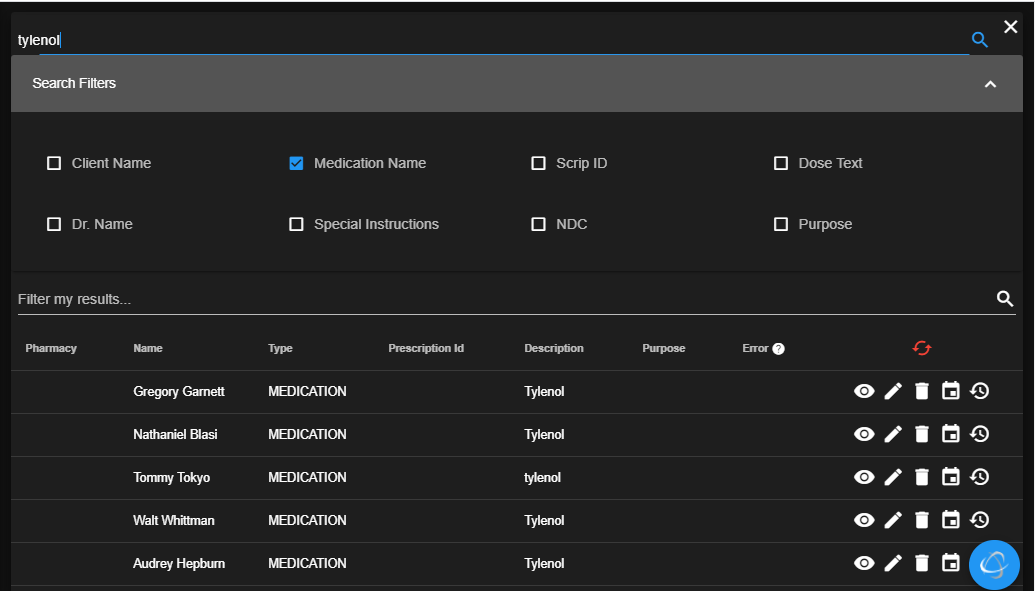
The Search Agency button searches within an agency using key words. It will search for a Medication, a Client, Doctor, Dose, etc. Check the boxes of what is trying to be searched for to filter the responses. MORE TO GO HERE
# Agency List

The agency list is a list of all the agencies that the user has access to.
# Yellow Triangle

If the agency has any medications that have failed QA, the yellow triangle will appear. This triangle will include a number indicating the number of medications that have failed QA. Clicking this Yellow Triangle will load the “Med Gen List” (the list of medications that have failed QA) for the entire agency.
# Select Client
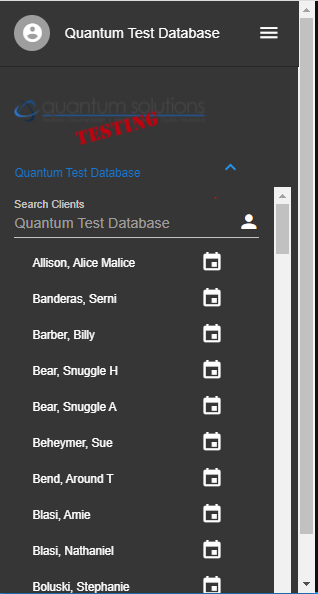
This is the client selector. The user can use the search bar at the top under their company logo to search for the client that they are looking for. The user can also use the scroll bar on the side to scroll through the list of clients. The clients are in alphabetical order by last name, and written a last name, first name.
# Yellow Triangle Per Client
If a client has a med that has the failed QA, a yellow triangle will appear next to their name with a number indicating the number of medications that have failed QA’s for that client.
# Calendar next to name

The calendar located next to the client’s name shows all the Med passes for that client. This can be viewed in either a Month, Week, or Day view.
# Month
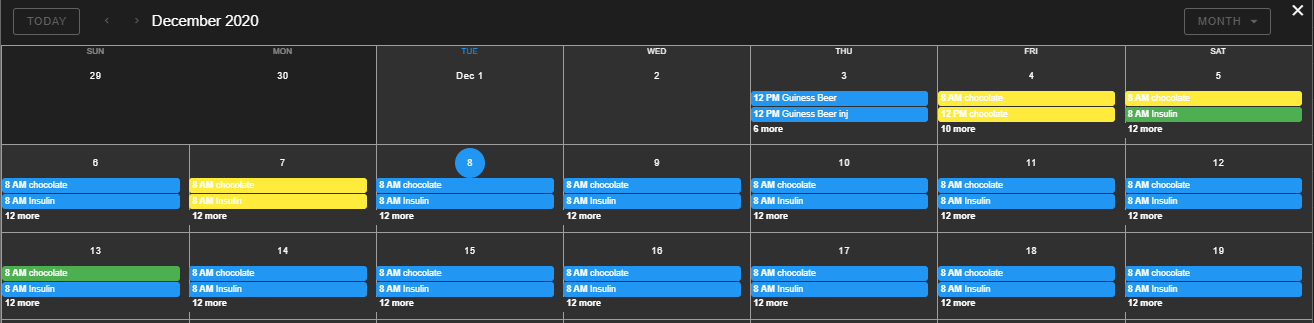
# Week
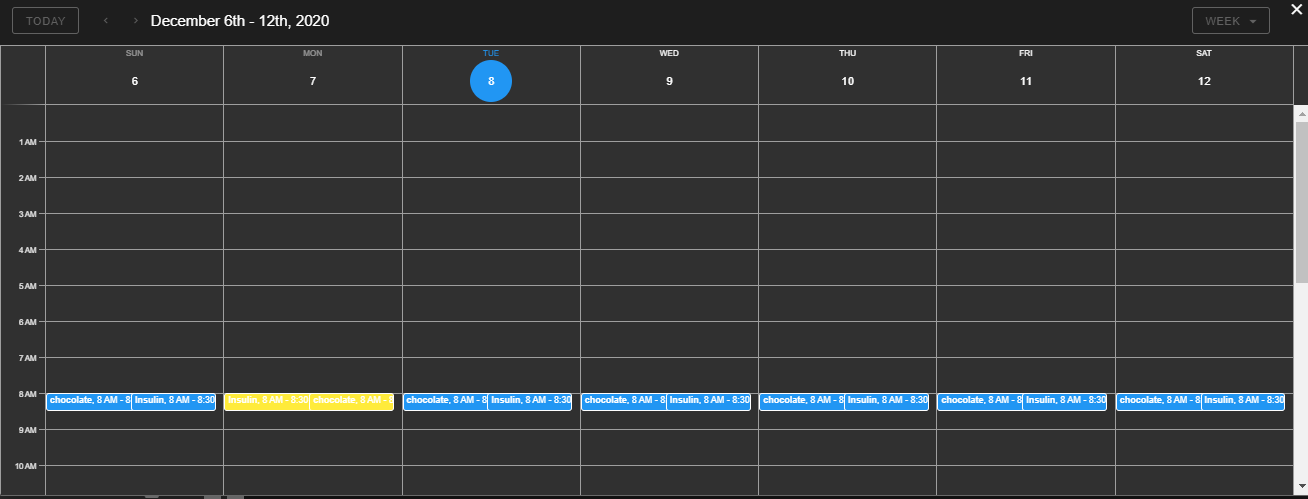
# Day

# Client Medication Grid

The Client Medication Grid shows all of the medications, treatments and alerts for the selected client.
Note
Active and Inactive Meds are not shown at the same time. Use the Active/Inactive Meds button to toggle between the inactive and active meds.
# Yellow Triangle Per Med

The yellow triangle next to a medication indicates the med has failed QA. Clicking the triangle will show a window with more information about why the med failed QA.
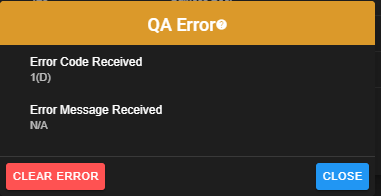
The Error Code describes what issue caused the medication to fail QA. The user can close the message and go into that Med and fix the error, or they can clear it and not fix the error. The QA Error message will not appear again for that specific problem again unless that information has been changed and a new error has occurred.
# Possible QA Errors
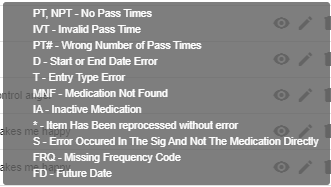
This is a small list of possible QA Errors. The code (on the left) stands for the meaning of the error (on the right).
# Med Functions

These Med functions are seen to the right of every medication listed.
Note
These functions may also be seen with a yellow triangle at the end stating that a QA has failed.
# View

The view function allows the user to view the med information without access to editing.
# Edit

The edit function allows the user to view and edit the medication.

These buttons are only shown while on the edit screen of a med with a QA error.

Reprocess Message
# Delete
The delete function allows the user to delete the medication. Once it is deleted it cannot be retrieved.

This message will appear at the top of the user’s screen for final confirmation to delete the medication.
# Calendar
The calendar here, next to the specific med (not the client name) will show all of the med passes for that specific med.
# History

This shows the changes over time to a particular med. It shows who made the change, what the change was, and when they made it. History also shows the how/what the med was before the change.
# New Medication

To enter a new Medication to the patient’s medication grid, select the ‘New Medication’ button. This will then open the Med Sheet.
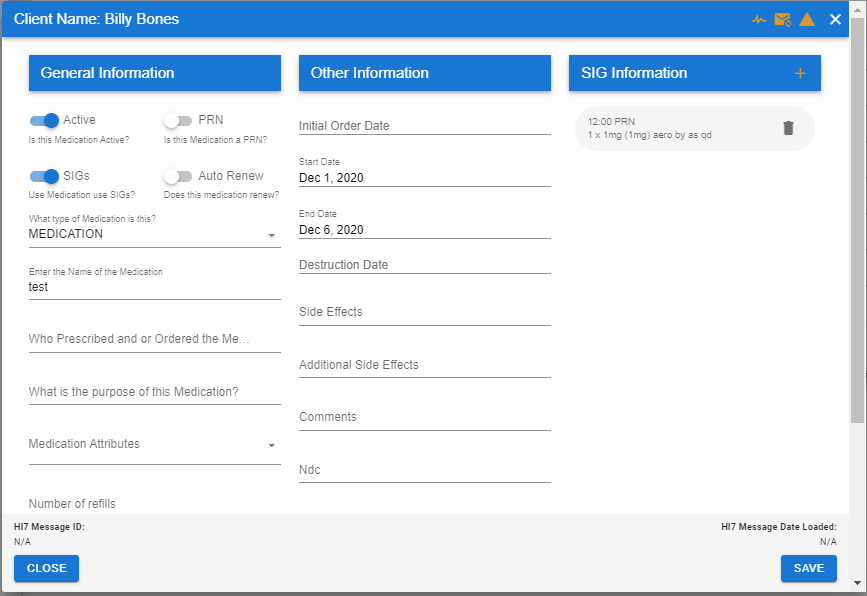
# Med Sheet
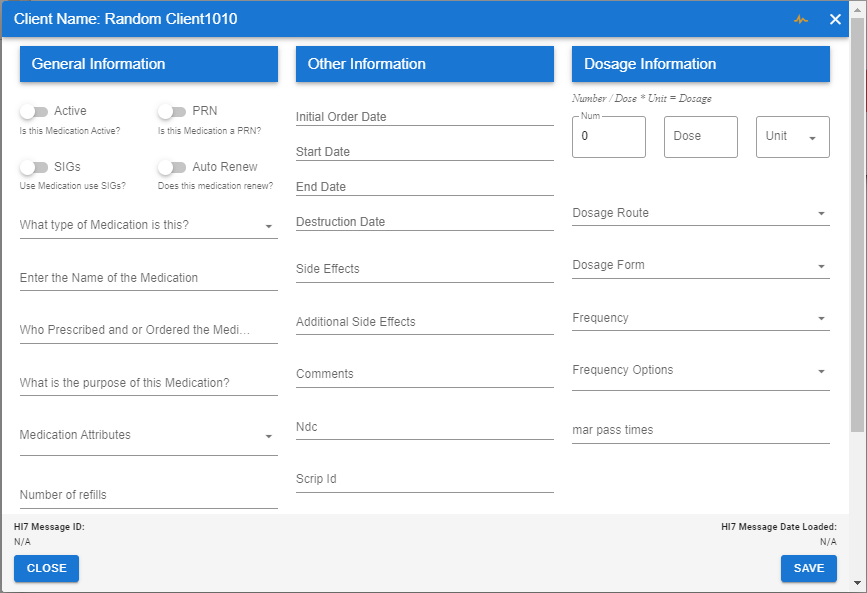
The Med Sheet allows specific information about the medication to be entered or updated. This information is stored inside the SIG.
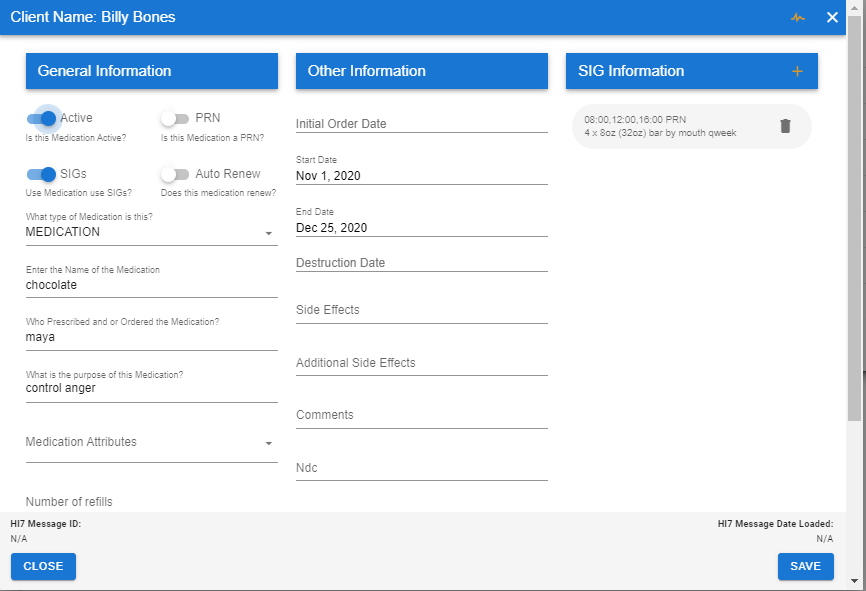

Up to 5 SIGs can be created per medications by clicking the little yellow “+”
Note
The user will have to split the medication with sliding scales into different SIGS when there are varying base doses for the different times of day.
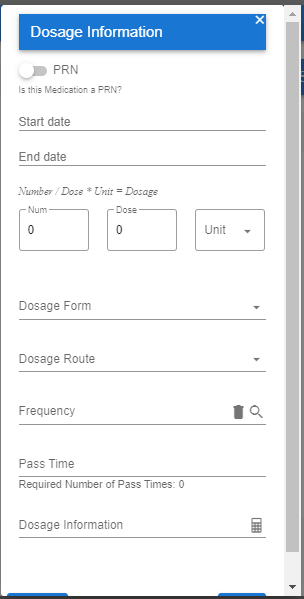
Creating or editing a SIG will occur in the Dosage Information screen. The base dose for the sliding scale pulls directly from the Num, Dose, and Units field in the SIG and that for it the units must say Unit as the measurement. This information is not always sent by the pharmacies in this way so it should be doublechecked.
Note
When the medication is given on a sliding scale, the number of units must be indicated on the Dosage Information Screen.

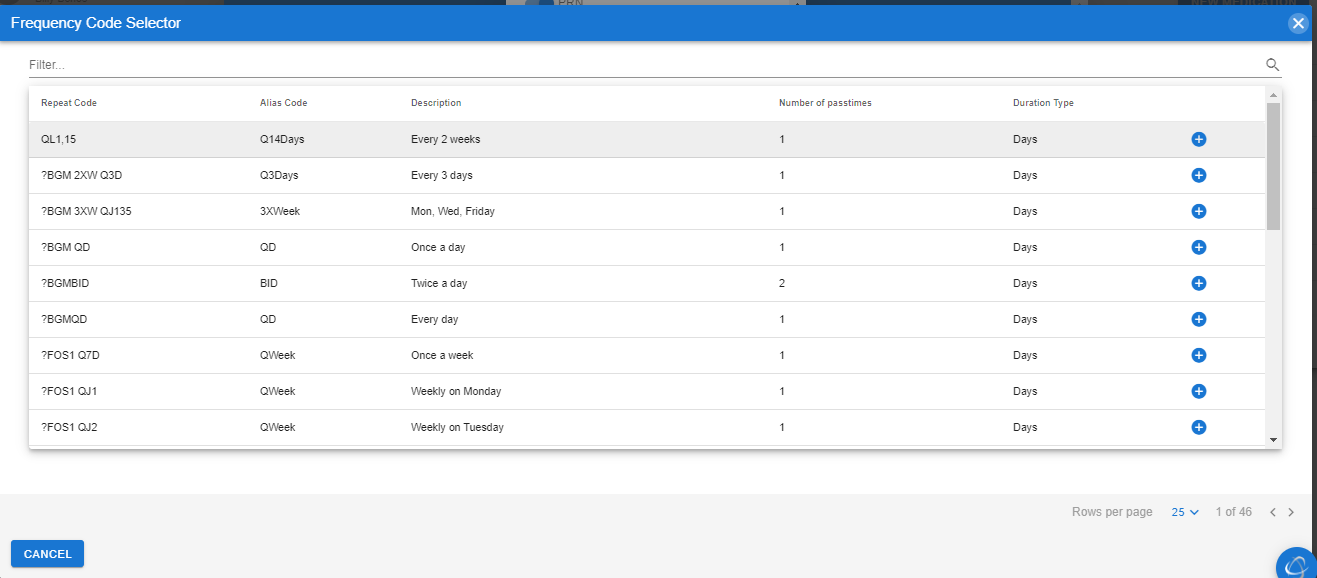
To configure a SIG, a frequency code must be chosen. The frequency code tells FlexMAR how often the med should be given.
Example
BID is twice a day.
QD is 4 times a day
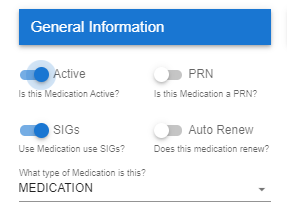
The Active toggle will make the medication active or inactive. When making a medication inactive, any future unpassed med passes will be deleted. When making a medication active, the system will generate future med passes.
Configuring a medication to be a PRN will allow it to be created without verifying the number of pass times required by the frequency code. The user should turn this on under the SIG.
Toggling the SIGs switch will switch the medication between SIG and non-SIG modes.
Auto Renew is a special toggle which allows medications which came from the pharmacy to generate med passes correctly when no End Date was specified. In this case, the End Date is set to the last day of the next month. Then, each month, when med passes are generated, Auto Renew medications have their End Date move out one month and med passes generated. If Auto Renew is NOT enabled, the medication will become inactive when it reaches its End Date.
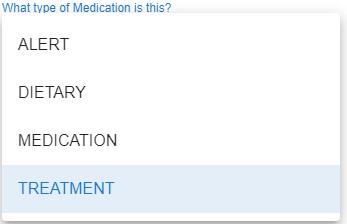
The medication can be configured to be an Alert, Dietary or Treatment. In this case, they will appear in different places in FlexMAR and will NOT be QA’d.
# Close
Close will exit out of the New Med Sheet and not save the new med.
# Save
Clicking the save button will save the changes to the medication. This will then QA the med and if it passes QA will generate med pass records if needed and close the New Med Sheet. If it fails QA, it will provide a reason for not being passed and the New Med Sheet will not be automatically closed.
# Vital Signs

This is the vital signs button. It is in the top right-hand corner of the Med Sheet. This will allow for the user to configure required Vital Signs for the medication.
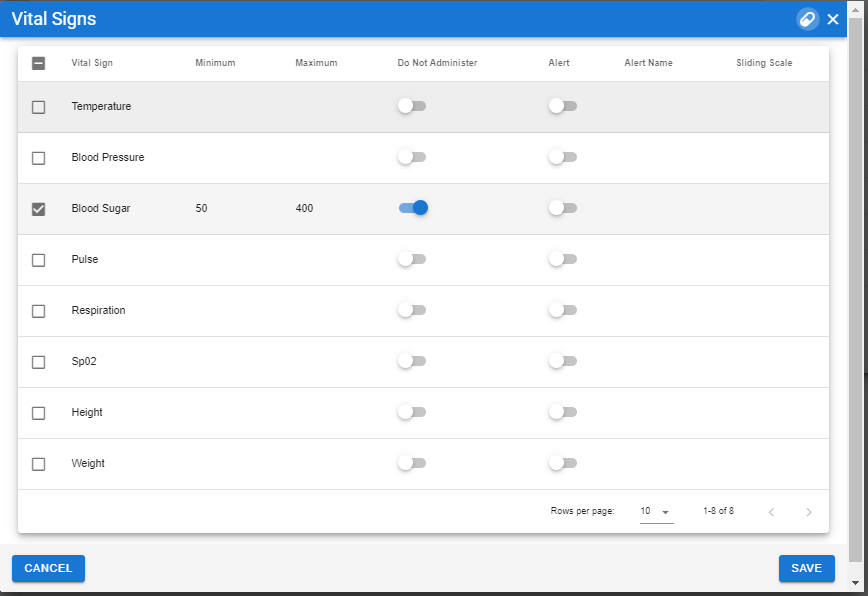
If a Vital Sign is checked, when the user attempts to pass this medication in FlexMAR the vital sign will be required to be recorded before passing the med. If a Min or Max value is configured, the vital sign reading must be greater than or equal to the min value if specified and less than or equal to the max value if specified.
If the vital sign reading is not in a valid range the user will be told that the vital sign is out of range. If the ‘Do Not Administer’ is enabled, then the user will not be permitted to pass the med. In some cases, the minimum and maximum range may be left NULL with Do Not Administer left unchecked to pass a medication with a sliding scale.
# Sliding Scale

The sliding scale button is in the top right corner on the vital signs screen. This will enable and disable the sliding scale functionality for the medication.
If Sliding Scale is enabled for this medication, the user will see the view and edit buttons for the sliding scale screen for each vital sign. The sliding scale view and edit functions are only visible when sliding scale is enabled.
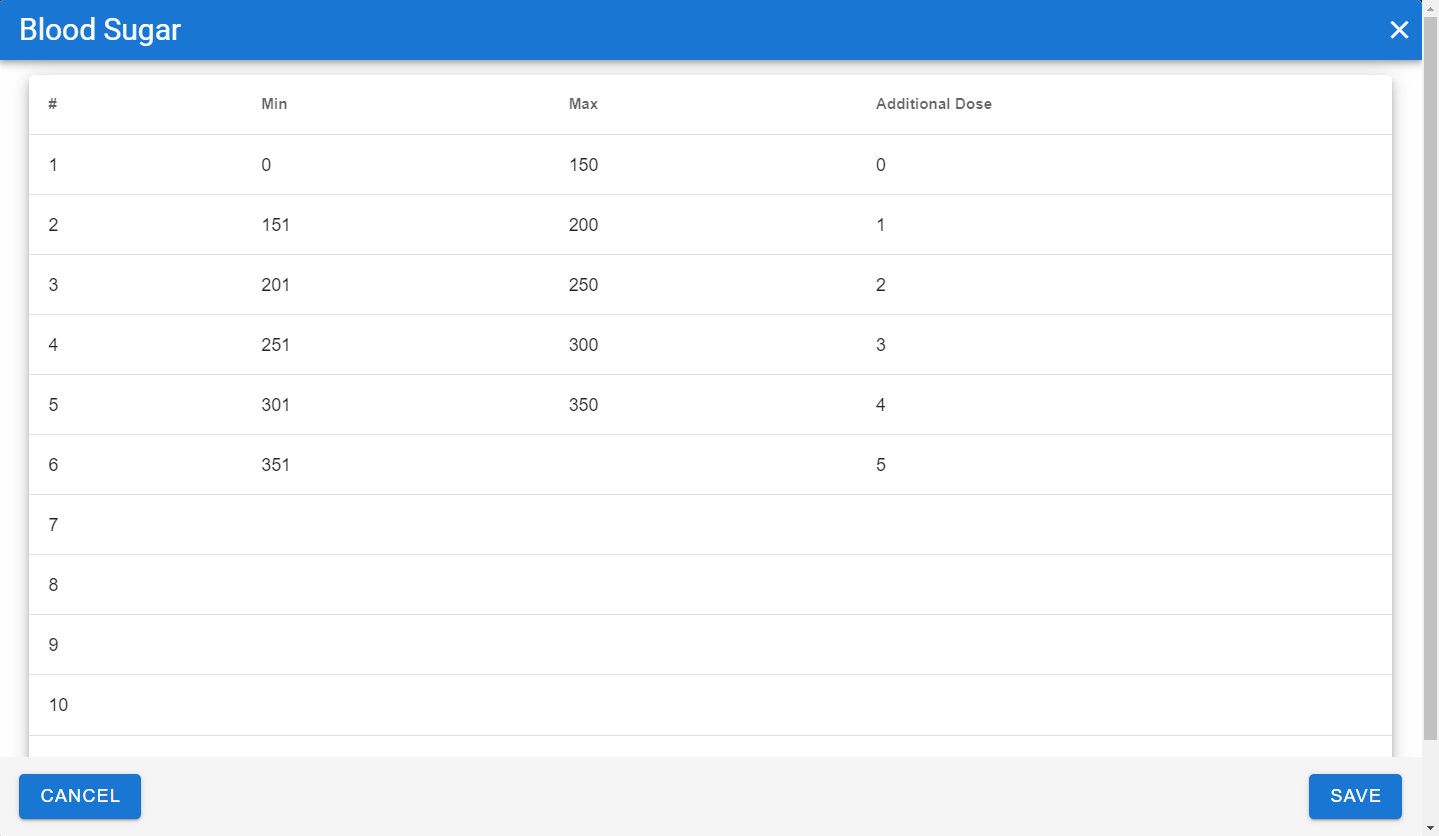
This screen is used to configure sliding scale. Sliding scale is used to calculate a dose based on the vital sign reading. The dose will be calculated by adding the additional dose to the base dose.
For Example
Given a Blood Sugar reading of 175, the additional dose would be 1 added tos the base dose as written in the SIG.
Last Updated: 04/05/2023